Rebecca Han:微信小程序仿知乎Demo實戰教程(適用1028版本)
從微信小程序開始內測到現在, 已經一個月過去了,終于把我自己的微信小程序 demo 墨跡完成了. 真的是墨跡完的, 連我自己都佩服自己的拖延癥了(懶癌少女已棄療*ヾ(´A`)ノ?*), 總之算是基本完成了(明明有很多組件啊 ...
之前有很長一段時間我算是知乎重度依賴, 所以這次 demo 的模仿對象選擇的是知乎(但是寫到一半發現我這個決定坑了, 這是后話).
demo 的界面設計以及交互設計均來自于知乎 Android 版本
- _工具_: [微信 web 開發者工具](https://mp.weixin.qq.com/debug/wxadoc/dev/devtools/download.html?t=1477579747265)
- 已經全面對非邀請內測用戶開放, 且在持續更新
(我碼代碼的過程中就更新了兩版, 所以開發時 IDE 版本不唯一)
不過其實忍受了半個小時微信的開發者工具之后, 我就改在 webstorm 中編輯了, 微信工具成了運行預覽的工具, 不過聽說IDE 中預覽的效果, 也不能保證與真機一樣哦~
- _設計和功能_: 知乎安卓版本 非常之簡易版
- _數據_: 畢竟是知乎, 為了防止版權問題, fake 的數據使用的是我自己的回答, 所以...
1. 基礎文件
app.json:
{
  "pages":[
    "pages/index/index",
    "pages/discovery/discovery",
    "pages/notify/notify",
    "pages/chat/chat",
    "pages/more/more",
    "pages/answer/answer",
    "pages/question/question"

  ],
  "window":{
    "backgroundTextStyle":"light",
    "navigationBarBackgroundColor": "#0068C4",
    "navigationBarTitleText": "知乎",
    "navigationBarTextStyle":"white",
    "enablePullDownRefresh":true
  },
  "tabBar": {
    "color": "#626567",
    "selectedColor": "#2A8CE5",
    "backgroundColor": "#FBFBFB",
    "borderStyle": "white",
    "list": [{
      "pagePath": "pages/index/index",
      "text": "",
      "iconPath": "images/index.png",
      "selectedIconPath": "images/index_focus.png"
    }, {
      "pagePath": "pages/discovery/discovery",
      "text": "",
      "iconPath": "images/discovery.png",
      "selectedIconPath": "images/discovery_focus.png"
    }, {
      "pagePath": "pages/notify/notify",
      "text": "",
      "iconPath": "images/ring.png",
      "selectedIconPath": "images/ring_focus.png"
    }, {
      "pagePath": "pages/chat/chat",
      "text": "",
      "iconPath": "images/chat.png",
      "selectedIconPath": "images/chat_focus.png"
    }, {
      "pagePath": "pages/more/more",
      "text": "",
      "iconPath": "images/burger.png",
      "selectedIconPath": "images/burger_focus.png"
    }]
  },
  "networkTimeout": {
    "request": 10000,
    "downloadFile": 10000
  },
  "debug": true
}
app.json文件中是對整個小程序的全局配置, 主要用到的字段有pages, window, tabBar, networkTimeout.
* pages 字段: 所有小程序的頁面都要在該字段中注冊, 該字段數組中的第一個page 默認為小程序首頁(設置tab 除外), 沒有在 pages 字段注冊過的頁面貌似不能夠進行有效的編譯(之前版本的編輯器可以,只是會影響配置文件等的生效, 編輯器更新后會報未注冊的錯誤).
* window 字段: 大多是關于小程序頂部 navigationbar 的一些設置
* tabBar字段: 如果你需要首頁面底部帶tabbar的樣式, 那么就在 tabBar 字段中設置每個 tab 對應的頁面, 按順序對應左至右, 包括路徑, tab 文字, tab圖標和選中狀態圖標.
* netwoTimeout: 設置網絡超時時間.
* debug: 開啟 debug 模式.
app.wxss 文件中為全局樣式, 也就是說這個文件中的樣式在所有的 page 中均可使用, 若其他頁面文件的 wxss 中定義了與該樣式文件中相同的屬性, 則該文件中的樣式被覆蓋, 規則與 css 優先規則大致相通.
app.js: 調用 login接口, 回調, 周期函數, 本地存儲等等邏輯代碼.
2. 頁面文件:
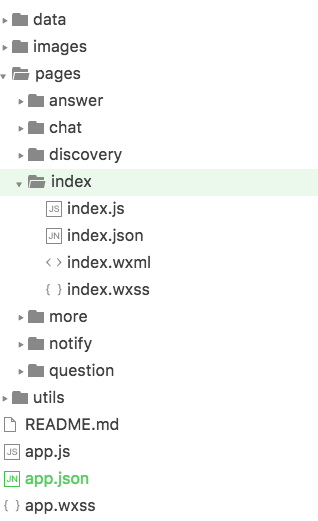 頁面文件由四部分組成
例如我們有一個首頁叫做 index, 則需要在 pages 文件夾下創建文件名相通的三個必要文件:
- index.wxml
- index.wxss
- index.js
*另外 index.json文件為可選, 功能與 app.json 相同, 為該頁面的配置文件, 但定義功能有限.*
3. UI
跟平時開發一樣, 最開始當然是碼 UI
除了需要依照微信的一些新的標簽和樣式規則, 其他與平時碼 UI 并沒有太大的不同
需要強調的是, flex 布局在微信小程序中 hin~~~~好用
不過, 同時作為女生和程序員, 不挑刺可就不是我了, 所以下面列舉了一些我遇上的坑, 其中有些也許不正確(多多包涵啦\(//?//)\), 有些也許已在 IDE 更新中修正
坑們:
1. 有一些 css 樣式在微信 IDE 中不支持, 例如 font-weight, letter-spacing(及類似調整字間距的樣式)等
2. <text/>不支持嵌套, 兩層<text/>嵌套的結構下, 內層<text/>中的內容會連續顯示兩次
(在 IDE 后續更新中已修正)
3. 若<view/>與<text/>在結構上并列的話, 顯示上會重合, 感受上類似<view/>級別高于<text/>, 防止內容相疊, 必須使用<view/>相并列. 所以并不能像某些地方說的, 把<view/>當做<div>去使用!
4. 元素之前有垂直相鄰 margin 的時候(符合 margin 折疊規則), 在微信小程序中會double 顯示, 即兩個元素的 margin 均攤開, 不遵循 margin 折疊規則.
5. <view/>標簽 hidden 屬性無效 ( v0.10.101400 中已修正 )
6. 部分情況下, 平級標簽 A 與 B 并列, 當 B 通過某些調整向 A 元素位置相疊的時候, 微信 IDE 解析出的效果是 A 的內容和背景色會覆蓋 B 元素與之重疊的部分. ( 普通瀏覽器解析應該是 B 覆蓋 A ).
7. 如果用模板+列表渲染的方式來渲染數據的話, 在模板中使用列表渲染的{ {item}}是無效的, 無法被正確識別, 所以列表渲染的時候要把復用的部分寫在列表渲染的代碼塊內 ( 屬于數據渲染部分, 后面會提到 )
( 待續... ... )
后面將對于一些我 demo 中寫到用到的部分進行說明
列表式的數據渲染
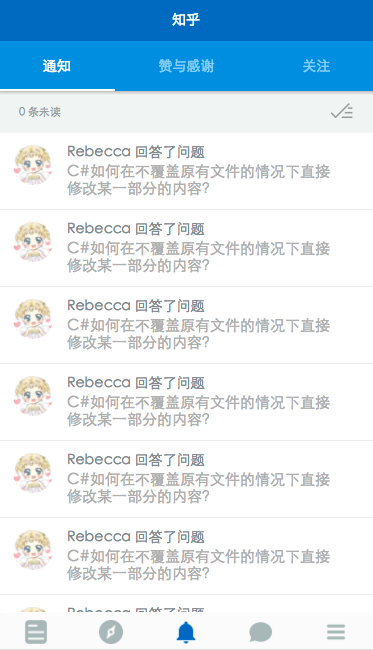
首頁
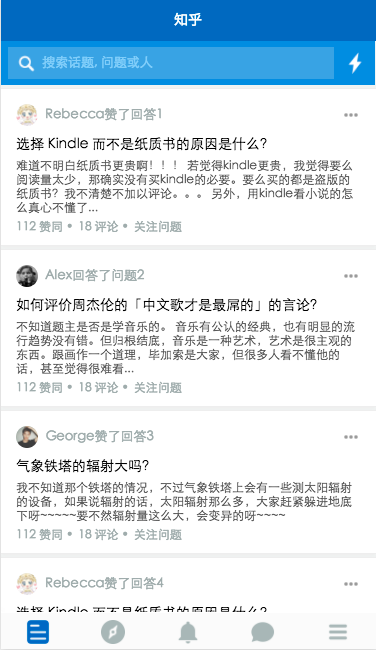
類似于首頁以及發現頁這種標準列表式的數據展現方式, 微信提供了很好的方案---列表渲染
<block wx:for="{{feed}}" wx:for-index="idx" wx:for-item="item" data-idx="{{idx}}">
   <view class="feed-item">
       <view class="feed-source">
           <a class="">
               <view class="avatar">
                   <image src="{{item.feed_source_img}}"></image>
               </view>
               <text>{{item.feed_source_name}}{{item.feed_source_txt}}</text>
           </a>
           <image class="item-more" mode="aspectFit" src="../../images/more.png"></image>
       </view>
       <view class="feed-content">
           <view class="question" qid="{{question_id}}" bindtap="bindQueTap">
               <a class="question-link">
                   <text>{{item.question}}</text>
               </a>
           </view>
           <view class="answer-body">
               <view bindtap="bindItemTap">
                   <text class="answer-txt" aid="{{answer_id}}">{{item.answer_ctnt}}</text>
               </view>
               <view class="answer-actions" bindtap="bindItemTap">
                   <view class="like dot">
                       <a>{{item.good_num}} 贊同 </a>
                   </view>
                   <view class="comments dot">
                       <a>{{item.comment_num}} 評論 </a>
                   </view>
                   <view class="follow-it">
                       <a>關注問題</a>
                   </view>
               </view>
           </view>
       </view>
   </view>
</block>
可以直觀的看出, 就是 for 循環來用重復的結構渲染一組數據
- for="{{}}"中的內容是想要循環的一組數據, 最外層為數組結構
- for-item 指定數組中當前元素的變量名
- for-index 指定數組中當前元素下標變量名
同樣也使用了 for 渲染的還有頂部的發現頁和通知頁等頂部的自定義 tabbar
頂部 tabbar 實現
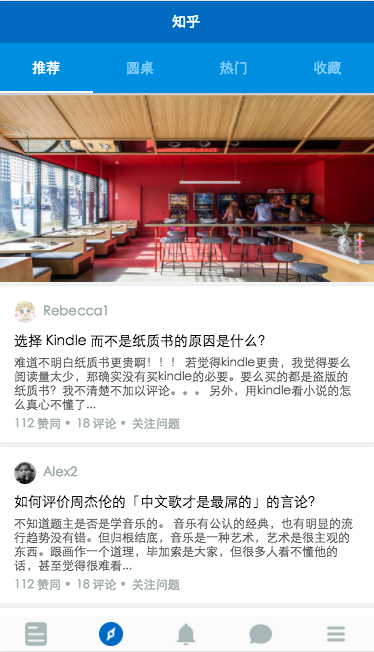
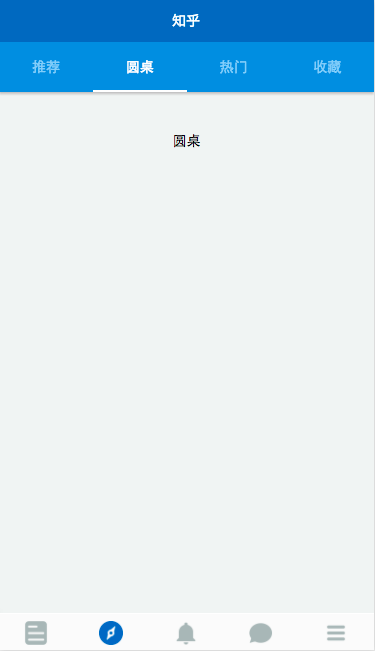
微信只提供了底部 tabbar, 所以頂部的要自己寫嘍~
頂部 tabbar 的實現在于 for 列表渲染以及 js 配合
wxml:
<view class="top-tab flex-wrp flex-tab " >
  <view class="toptab flex-item {{currentNavtab==idx ? 'active' : ''}}" wx:for="{{navTab}}" wx:for-index="idx" wx:for-item="itemName" data-idx="{{idx}}" bindtap="switchTab">
    {{itemName}}
  </view>
</view>
<scroll-view scroll-y="true" class="container discovery withtab" bindscrolltoupper="upper" bindscrolltolower="lower"  scroll-into-view="{{toView}}" scroll-top="{{scrollTop}}">
  <view class="ctnt0" hidden="{{currentNavtab==0 ? '' : true}}">
  </view>
  <view class="ctnt1 placehold" hidden="{{currentNavtab==1 ? '' : true}}">
    <text>圓桌</text>
  </view>
  <view class="ctnt2 placehold" hidden="{{currentNavtab==2 ? '' : true}}">
    <text>熱門</text>
  </view>
  <view class="ctnt3 placehold" hidden="{{currentNavtab==3 ? '' : true}}">
    <text>收藏</text>
  </view>
</scroll-view>
js:
//discovery.js
Page({
  data: {
    navTab: ["推薦", "圓桌", "熱門", "收藏"],
    currentNavtab: "0"
  },
  onLoad: function () {
    console.log('onLoad')
  },
  switchTab: function(e){
    this.setData({
      currentNavtab: e.currentTarget.dataset.idx
    });
  }
});
由于微信不支持任何 dom 和 window 對象, 所以 tabbar的實現依賴于微信提供的視圖層的展示邏輯, 以及視圖與數據之間的綁定機制.
綁定點擊事件, 通過改變一個 data- 屬性的值, 來控制元素的類的改變( 從而改變樣式等 )
輪播圖
<swiper class="activity" indicator-dots="{{indicatorDots}}"
       autoplay="{{autoplay}}" interval="{{interval}}" duration="{{duration}}">
 <block wx:for="{{imgUrls}}">
   <swiper-item>
     <image src="{{item}}" class="slide-image" width="355" height="155"/>
   </swiper-item>
 </block>
</swiper>
imgUrls: [
 '../../images/24213.jpg',
 '../../images/24280.jpg',
 '../../images/1444983318907-_DSC1826.jpg'
],
indicatorDots: false,
autoplay: true,
interval: 5000,
duration: 1000,
feed: [],
feed_length: 0
輪播圖的實現使用的是微信提供的 swiper 組件, 該組件貼心的提供了各種屬性選擇, 常用的包括autoplay, interval 時間, duration等
<swiper-item>中包含的是所有輪播的圖片, 為了方便修改圖片數據, 同樣采用 for 渲染綁定 data 的方式
下拉刷新, 上拉加載, 以及數據請求
刷新及繼續加載的動作, 依靠的是<scroll-view>標簽, 及配套的upper 和 lower 事件
<scroll-view>標簽的屬性提供了 bindscrolltoupper 和 bindscrolltolower來綁定滾動到頂部及底部所觸發的事件, 同時upper-threshold 和 lower-threshold 能夠調整觸發時距邊界的距離
除上述之外, 還提供橫向滾動, 滾動觸發事件, 及設置滾動條位置等...
<scroll-view scroll-y="true" class="container" bindscrolltoupper="upper" upper-threshold="10" lower-threshold="5" bindscrolltolower="lower"  scroll-into-view="{{toView}}" scroll-top="{{scrollTop}}">
    <block wx:for="{{feed}}" wx:for-index="idx" wx:for-item="item" data-idx="{{idx}}">
        <view class="feed-item">
            <view class="feed-source">
                <a class="">
                    <view class="avatar">
                        <image src="{{item.feed_source_img}}"></image>
                    </view>
                    <text>{{item.feed_source_name}}{{item.feed_source_txt}}</text>
                </a>
                <image class="item-more" mode="aspectFit" src="../../images/more.png"></image>
            </view>
            <view class="feed-content">
                <view class="question" qid="{{question_id}}" bindtap="bindQueTap">
                    <a class="question-link">
                        <text>{{item.question}}</text>
                    </a>
                </view>
                <view class="answer-body">
                    <view bindtap="bindItemTap">
                        <text class="answer-txt" aid="{{answer_id}}">{ {item.answer_ctnt}}</text>
                    </view>
                    <view class="answer-actions" bindtap="bindItemTap">
                        <view class="like dot">
                            <a>{{item.good_num}} 贊同 </a>
                        </view>
                        <view class="comments dot">
                            <a>{{item.comment_num}} 評論 </a>
                        </view>
                        <view class="follow-it">
                            <a>關注問題</a>
                        </view>
                    </view>
                </view>
            </view>
        </view>
    </block>
</scroll-view>
滾動至頂或至底時, 觸發的加載數據的事件, 本應該調用微信提供的網絡請求 API 來獲取數據. 但是比較坑的是, 我在選擇寫仿知乎 demo 的時候沒有注意到知乎不提供開放 API, 而微信的 API 不支持直接對.json 文件進行本地請求, 無奈之下, 選擇在 js 文件中偽造一段數據, module.exports拋出, 來 fake 數據請求
upper: function () {
    wx.showNavigationBarLoading()
    this.refresh();
    console.log("upper");
    setTimeout(function(){wx.hideNavigationBarLoading();wx.stopPullDownRefresh();}, 2000);
  },
  lower: function (e) {
    wx.showNavigationBarLoading();
    var that = this;
    setTimeout(function(){wx.hideNavigationBarLoading();that.nextLoad();}, 1000);
    console.log("lower")
  },
  //scroll: function (e) {
  //  console.log("scroll")
  //},

  //網絡請求數據, 實現刷新
  refresh0: function(){
    var index_api = '';
    util.getData(index_api)
        .then(function(data){
          //this.setData({
          //
          //});
          console.log(data);
        });
  },
  //使用本地 fake 數據實現刷新效果
  refresh: function(){
    var feed = util.getDiscovery();
    console.log("loaddata");
    var feed_data = feed.data;
    this.setData({
      feed:feed_data,
      feed_length: feed_data.length
    });
  },
  //使用本地 fake 數據實現繼續加載效果
  nextLoad: function(){
    var next = util.discoveryNext();
    console.log("continueload");
    var next_data = next.data;
    this.setData({
      feed: this.data.feed.concat(next_data),
      feed_length: this.data.feed_length + next_data.length
    });
  }
由于是 fake 的數據, 所以這個 demo 并沒有做真實的帶參跳轉, 查詢等功能
加載數據的同時, 使用微信提供的加載動畫wx.showNavigationBarLoading();

其他
- 綁定點擊事件, 進行頁面的跳轉wx.navigateTo
- 部分模塊化
- input, image 組件等
后續
其實還有大量的組件和 API 還沒有用過, 這個 demo 也許后續還會有更新呦, 這取決于懶癌少女的病情嚴重程度了
項目地址
傳送門: GitHub - RebeccaHanjw/weapp-wechat-zhihu: 微信中的知乎--微信小程序 demo // Zhihu in Wechat
項目下載:weapp-wechat-zhihu-master.zip也許算是些感受?
其實作為一個小前端, 由于工作中的原因, 使用 MVVM 其實非常少的, 不過寫了這個微信小程序 demo 之后, 更加把這方便的思維理順了. 當然, 寫完之后回頭看, 還是有超多的不足, 明明好些地方能再換一種寫法的. 不過畢竟是我第一次嘗試用新鮮熱乎的東西寫小 demo, 也是第一次嘗試寫教程...或者算是記錄? whatever~~
還有, 非項目的配圖均來自網絡哦~~
Anyway~ 希望除了寫代碼之外, 還能在碼文字的道路上也多走走吧, 畢竟我是要做代碼小仙女的人呀\(≧?≦)ゞ