0.前言
微信小程序跳一跳是個挺不錯的游戲,但身為一個天生愛折騰的geek,還是忍不住挑戰(zhàn)這游戲的上限。
效果如下動圖,游戲開始,程序會自動識別小人的坐標,你只需點擊要跳到的那一個方塊,程序?qū)⒆詣铀愠霾湍惆聪缕聊蝗舾擅耄∪思赐瓿梢淮翁S。
效果圖
1.相關技術
實現(xiàn)起來其實相當簡單,主要用到幾個技術點:
懸浮窗
在Android代碼中執(zhí)行Shell命令實現(xiàn)模擬觸屏,截取屏幕圖片
opencv進行圖片定位識別
注意:Android程序要執(zhí)行shell命令,得有root權限,所以要運行這個程序,你需要有個已經(jīng)root的手機。
2.實現(xiàn)思路
2.1 如何知道要按多久屏幕
很顯而易見地:小人與目標方塊離得越遠,需要按下屏幕的時間就越長,兩者成正相關。我們可以有個大膽的假設:兩者能否用簡單的線性關系去擬合,那么就有以下的公式:
按下時間 = 距離 * 常量系數(shù)
這個常數(shù)怎么確定呢?其實就是猜,多調(diào)試幾次,就能拿到比較準確的數(shù)字。
如果距離過近或過遠,落點產(chǎn)生誤差,我們可以根據(jù)不同距離范圍動態(tài)調(diào)整系數(shù)。
2.2 小人與目標方塊坐標與距離的獲取###
要算距離,首先要得到坐標,筆者想到了幾種方式:
點擊小人底部,然后點擊目標方塊頂部,兩次點擊事件回調(diào),就能得到兩個坐標。
用圖像處理得到小人的坐標,目標方塊坐標由點擊屏幕產(chǎn)生。
小人與目標方塊坐標都用圖像識別得到。
可見第三種最理想,甚至能讓程序自己在玩游戲,但目前本程序采用了第二種方式。
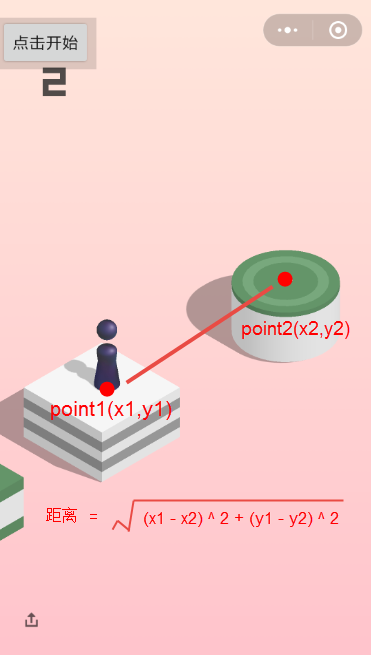
距離公式.png
得到坐標后,根據(jù)兩點間距離公式,算出小人與目標方塊的距離。
2.3 懸浮窗
有上一小節(jié)可知,目標方塊的坐標需要我們點擊屏幕產(chǎn)生,此時就有個問題:我們要獲取目標方塊坐標,但不能直接點在小程序上,否則會觸發(fā)小人跳動。因此,我們可以創(chuàng)建一個透明的懸浮窗來解決這個問題。
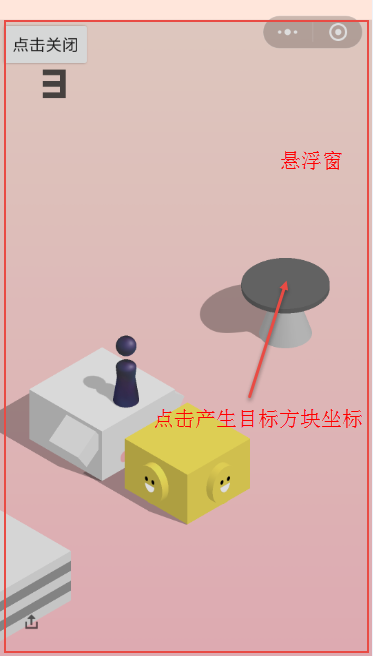
使用懸浮窗,捕抓目標方塊坐標
當懸浮窗覆蓋在小程序上方,點擊小程序上的目標方塊,實際上是點擊透明的懸浮窗,因此對應位置的坐標就能被我們捕獲,并不會觸發(fā)小程序。
2.4 openCV的使用
判斷小人在屏幕的位置,實質(zhì)上是一種“查找B圖中在A圖中的位置”的需求,其中A圖就是手機屏幕截圖。這需求我們可以使用openCV的Imgproc.matchTemplate方法完成。
在游戲開始時,執(zhí)行shell指令截取屏幕圖像,然后用Imgproc.matchTemplate方法查找截圖中小人的位置,記錄作為起跳坐標。
等一輪跳躍結束后,再次執(zhí)行shell命令截取屏幕圖像,分析小人跳躍后的位置,做好下一次跳躍的準備。

match.png
2.5 在程序中執(zhí)行shell指令
本程序使用到shell指令的地方有兩處:
模擬手指在屏幕按下。
截取手機屏幕圖片。
對應的adb指令如下:
adb shell input touchscreen swipe 1000 1000 1200 1200 time
adb shell /system/bin/screencap -p /storage/emulated/0/JumpX/screenshot.png
要注意的是,在執(zhí)行swipe指令前,需要將懸浮窗remove掉,否則swipe指令會作用在懸浮窗上,而非小程序。
最后推薦一個好用的Shell工具類:
https://github.com/Trinea/android-common/blob/master/src/cn/trinea/android/common/util/ShellUtils.java
3.部分關鍵代碼
3.1 懸浮窗
懸浮窗的實現(xiàn)很簡單,網(wǎng)上也有很多參考資料。
//設置懸浮窗參數(shù)并顯示
mParams = new WindowManager.LayoutParams();
mWindowManager = (WindowManager) getApplication().getSystemService(Context.WINDOW_SERVICE);
mParams.type = WindowManager.LayoutParams.TYPE_SYSTEM_ALERT;
mParams.format = PixelFormat.RGBA_8888;
mParams.flags = WindowManager.LayoutParams.FLAG_NOT_FOCUSABLE;
mParams.gravity = Gravity.LEFT | Gravity.TOP;
mParams.x = 0;
mParams.y = 0;
mParams.width = JumpUtils.SMALL_SIZE_WIDTH;
mParams.height = JumpUtils.SMALL_SIZE_HIGH;
mLinearLayout = (MyLinearLayout) LayoutInflater.from(getApplication()).inflate(R.layout.layout, null);
mButton = mLinearLayout.findViewById(R.id.btn);
mWindowManager.addView(mLinearLayout, mParams);
WindowManager添加了一個繼承于LinearLayout的控件,實現(xiàn)該控件主要是便于重寫onDraw方法,繪制小人位置區(qū)域,關鍵代碼如下。
@Override
protected void onDraw(Canvas canvas) {
super.onDraw(canvas);
if (mIsNeed2DrawLittleBoyRect && point1 != null && point2 != null) {
Paint paint = new Paint();
paint.setColor(Color.RED);
paint.setStyle(Paint.Style.STROKE);
paint.setStrokeWidth(6f);
paint.setAntiAlias(true);
RectF rectF = new RectF(point1.x, point1.y, point2.x, point2.y);
canvas.drawRect(rectF, paint);
}
if (!mIsNeed2DrawLittleBoyRect && point1 != null && point2 != null ) {
Paint paint = new Paint();
paint.setColor(Color.parseColor("#00000000"));
paint.setStyle(Paint.Style.FILL);
RectF rectF = new RectF(point1.x, point1.y, point2.x, point2.y);
canvas.drawRect(rectF, paint);
}
}
3.2 openCV識別小人坐標
openCV識別小人的關鍵代碼如下:
private void try2MatchLittleBoy() {
Mat source = new Mat();
Mat template = new Mat();
Bitmap bitmapSource = BitmapFactory.decodeFile(JumpUtils.SCREENSHOT_FILE_NAME);
Bitmap bitmapTemplate = BitmapFactory.decodeFile(JumpUtils.LITTLE_BOY_FILE_NAME);
Utils.bitmapToMat(bitmapSource, source);
Utils.bitmapToMat(bitmapTemplate, template);
Mat result = Mat.zeros(source.rows() - template.rows() + 1, source.cols() - template.cols() + 1, CvType.CV_32FC1);
Imgproc.matchTemplate(source, template, result, Imgproc.TM_SQDIFF_NORMED);
Core.normalize(result, result, 0, 1, Core.NORM_MINMAX, -1);
Core.MinMaxLocResult mlr = Core.minMaxLoc(result);
org.opencv.core.Point matchLoc = mlr.minLoc;
notifyDrawLittleBoyRect(matchLoc, template);
}
3.3 算出按下屏幕時間
得到兩點距離后,根據(jù)不同的距離范圍有不同系數(shù),算出需要按下屏幕時間。
double distance = Math.sqrt(Math.pow(firstPoint.x - secondPoint.x, 2) + Math.pow(firstPoint.y - secondPoint.y, 2));
float ratio = distance > 600 ? JumpUtils.JUMP_SPEED_SLOW : distance < 300 ? JumpUtils.JUMP_SPEED_FAST : JumpUtils.JUMP_SPEED;
final double holdTime = distance * ratio;
3.4 執(zhí)行Shell 指令
模擬按下屏幕:
new Thread(new Runnable() {
@Override
public void run() {
String command[] = new String[]{"sh", "-c",
"input touchscreen swipe 1000 1000 1000 1000 " + (int)holdTime};
ShellUtils.CommandResult commandResult = ShellUtils.execCommand(command, true, true);
Log.d("Achilles:", commandResult.errorMsg);
}
}).start();
截取屏幕圖片:
new Thread(new Runnable() {
@Override
public void run() {
String command[] = new String[]{"sh", "-p",
"/system/bin/screencap " + JumpUtils.SCREENSHOT_FILE_NAME};
ShellUtils.CommandResult commandResult = ShellUtils.execCommand(command, true, true);
Log.d("Achilles:", commandResult.errorMsg);
}
}).start();
mHandler.sendEmptyMessageDelayed(MSG_SCREENSHOT_COMPLETE, 800);